Battery switch on travel trailer function is crucial for managing your RV’s power. Understanding how to use it properly ensures smooth operation and extends the life of your batteries. This guide will walk you through everything from basic functionality to advanced troubleshooting, empowering you to become a confident RV electrical system manager.
We’ll cover different battery switch types, including manual, automatic, and remote switches, detailing their pros and cons and helping you choose the best one for your needs. We’ll also tackle common issues, providing clear troubleshooting steps and safety tips to keep you and your RV safe. Get ready to master your travel trailer’s power system!
Safety Precautions and Best Practices

Working with RV batteries and electrical systems requires caution. Improper handling can lead to serious injury or damage to your travel trailer. Always prioritize safety when performing any electrical work. This section Artikels crucial safety measures and best practices for maintaining your battery switch and associated wiring.
Safety Precautions When Working with RV Batteries and Electrical Systems
Before beginning any work, disconnect the negative (-) battery cable first. This prevents accidental shorts and reduces the risk of electrical shock. Always wear safety glasses to protect your eyes from sparks or acid splashes. Work in a well-ventilated area, as battery fumes can be hazardous. Never smoke or use open flames near batteries.
If working with a battery that is leaking acid, wear protective gloves and clothing, and use caution when cleaning up the spill. Neutralize spilled acid with baking soda and water, then carefully clean the area. If you are unsure about any aspect of the process, consult a qualified RV technician.
Best Practices for Maintaining the Battery Switch and its Associated Wiring
Regular inspection of the battery switch and wiring is crucial for preventing problems. Visually inspect the switch and wiring for any signs of corrosion, damage, or loose connections. Tighten any loose connections using the appropriate tools. Clean any corrosion using a wire brush and baking soda solution. Apply a corrosion inhibitor to terminals after cleaning to prevent future corrosion.
Ensure that all connections are securely fastened and properly insulated. Consider using a battery disconnect switch that includes a built-in circuit breaker for added protection. A yearly professional inspection is highly recommended, especially in harsh climates.
Potential Hazards Associated with Incorrect Battery Switch Operation
Incorrect operation of the battery switch can lead to several hazards. Accidental short circuits can occur if connections are not properly made or if the switch itself is faulty, potentially causing sparks, fires, or damage to the electrical system. Improper disconnection can leave appliances or systems energized, leading to electrical shocks or damage. Leaving the battery switch on while storing your trailer can lead to battery drain and potentially damage sensitive electronics.
Furthermore, incorrect wiring can lead to blown fuses, damage to appliances, and even a fire. Finally, failure to disconnect the battery before working on the electrical system creates a significant risk of electrical shock.
So, you’re planning a trip? Awesome! First things first: get yourself sorted with travel insurance. Check out Aon travel insurance for some solid options; they’ve got you covered for most eventualities. Then, if you’re an audiophile like me, don’t forget to plan your audiophile travel setup – you wouldn’t want to miss out on your favorite tunes while exploring new places, right?
Make sure to pack your headphones and portable DAC carefully!
Recommended Tools and Safety Equipment
A basic toolkit for working on a travel trailer’s electrical system should include: a battery wrench, insulated screwdrivers (Phillips and flathead), wire strippers/cutters, crimpers, pliers, electrical tape, a multimeter, safety glasses, work gloves, and a battery terminal cleaner. For more extensive work, a voltage tester and a circuit breaker tester might also be necessary. Always prioritize safety; the investment in appropriate tools and safety equipment is far less than the cost of potential repairs or injuries.
Improving Battery Management with a Battery Switch: Battery Switch On Travel Trailer Function
A battery switch is a crucial component for any travel trailer owner looking to extend the lifespan of their batteries and optimize power usage. It acts as a central control point, allowing you to manage power flow efficiently and prevent situations that can damage your batteries. By understanding its capabilities, you can significantly improve your RV’s electrical system performance and overall battery health.
A battery switch prevents premature battery failure by preventing over-discharge. Over-discharge happens when you draw more power from your batteries than they can safely supply. This leads to sulfation, a process that reduces battery capacity and ultimately shortens its lifespan. A properly used battery switch allows you to isolate the house batteries from the rest of the system, ensuring that they don’t drain completely.
This protection is especially important when you’re parked for extended periods or if you have a higher power demand than your charging system can handle.
Power Distribution Optimization, Battery switch on travel trailer function
The battery switch acts as a gatekeeper, directing power to the appropriate systems. This is particularly helpful in RVs with multiple battery banks (like a dedicated starting battery and a house battery bank). You can choose to power only essential systems (like the refrigerator) from the house batteries while conserving power in the starting battery. This selective power distribution ensures that critical functions are always available, even if one battery bank is low.
For example, you might run your lights and water pump from the house battery while keeping the starting battery fully charged for engine ignition.
So, you’re planning a trip? Awesome! First things first: get travel insurance. Seriously, check out Aon travel insurance – they’ve got you covered. Then, if you’re an audiophile like me, don’t forget your tunes! Planning your audiophile travel setup beforehand is key for a smooth and sonically pleasing journey. It’s all about preparation, people!
Improved Energy Efficiency
By selectively powering systems, a battery switch helps reduce unnecessary energy consumption. For instance, if you’re leaving your RV for a short period, you can switch off the house batteries to prevent any parasitic drain from appliances left unintentionally switched on (like a small interior light or a fan). This prevents the batteries from slowly discharging over time, thus extending their lifespan and improving the overall efficiency of your power system.
This simple action can make a substantial difference in the long run, reducing the frequency of battery replacements.
Battery Isolation for Storage and Maintenance
A battery switch provides a convenient way to isolate batteries during periods of inactivity, such as long-term storage or maintenance. By switching off the house batteries, you prevent any potential drain, ensuring that they remain fully charged and ready to use when you need them. This is crucial for preventing sulfation and maintaining the overall health of your batteries.
Similarly, isolating a battery allows for safer maintenance procedures, preventing accidental short circuits or shocks during cleaning or testing.
Visual Representation of Battery Switch Components
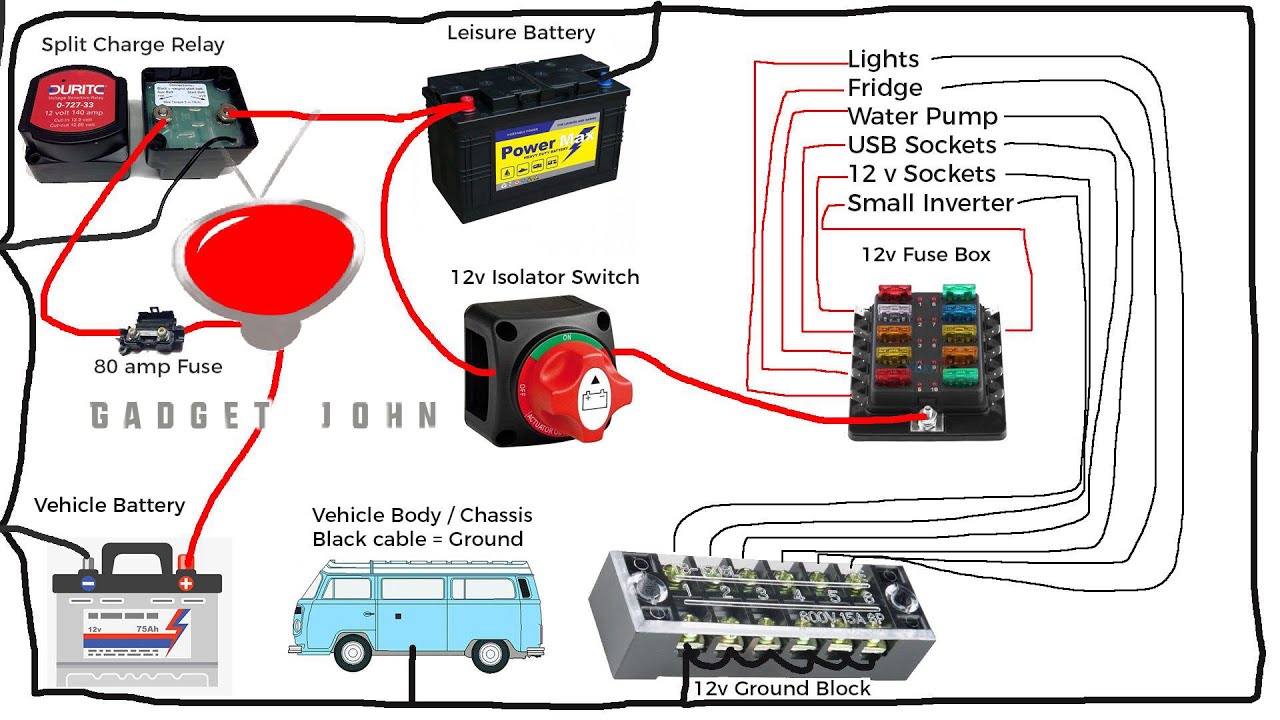
Understanding the physical components of a battery switch is crucial for safe and effective installation and use. This section provides a detailed look at a typical switch, its connections, and visual indicators.A typical battery switch is a relatively compact device, often rectangular or square, made of durable, weather-resistant plastic or metal. It houses multiple heavy-duty terminals for connecting the positive and negative cables from your trailer batteries and the main power source.
These terminals are usually clearly marked, often with large, easy-to-read lettering indicating their function (e.g., “Battery 1,” “Battery 2,” “Main”). The switch itself will have a mechanism (lever, rotary dial, or push-button) that allows you to select which battery or combination of batteries are connected to the trailer’s electrical system.
Battery Switch Terminals and Connections
The terminals on a battery switch are designed to accept large gauge wires, typically 4-gauge or larger, depending on the amperage requirements of your trailer’s electrical system. Each terminal is secured using bolts and nuts or clamps, ensuring a tight and reliable connection. Improperly tightened connections can lead to overheating and potential fire hazards. It’s essential to use appropriately sized wire lugs or connectors on the ends of your battery cables to fit the terminals securely.
The terminals are usually clearly marked with positive (+) and negative (-) symbols to prevent accidental short circuits. These markings are critical to avoid connecting positive to negative, which could cause immediate damage to your electrical system.
Battery Switch Installation Process
Installing a battery switch involves several steps. First, you’ll need to choose the correct location for the switch, ensuring easy access and protection from the elements. Once the location is determined, you’ll need to securely mount the switch to a stable surface using appropriate fasteners. Next, connect the battery cables. Use the correct gauge wire—a larger gauge (smaller number) for higher amperage—and ensure all connections are tight and secure.
Remember to connect the positive cables to the positive terminals and the negative cables to the negative terminals. Always disconnect the negative terminal first when working with batteries and reconnect it last. Use appropriate wire connectors or lugs to prevent any loose connections. Finally, after connecting all cables, double-check all connections for tightness and proper polarity.
Visual Indicators on Battery Switches
Many battery switches include visual indicators to help you easily see the current status of the switch. These can include:* Position Indicators: A lever switch might have clear markings indicating which battery or battery combination is currently active (e.g., “Battery 1,” “Battery 2,” “Both,” “Off”). A rotary switch might use similar markings on the dial itself.
LED Indicators
Some switches incorporate LEDs to visually confirm the selected position. A green light might indicate “On,” while a red light might show “Off” or a fault condition.These visual indicators provide a quick and easy way to check the battery switch’s status without having to manually test the system. They enhance safety by preventing accidental discharges or connections.
Mastering your travel trailer’s battery switch is key to a worry-free RV experience. By understanding its function, troubleshooting common problems, and following safety guidelines, you’ll ensure reliable power and extend the lifespan of your batteries. Remember, a well-maintained battery switch is a crucial component of a smoothly functioning RV, so keep this guide handy for reference!
Commonly Asked Questions
What size battery switch do I need?
The correct size depends on your battery bank’s amperage. Consult your battery and switch specifications to ensure compatibility. Always choose a switch with a higher amperage rating than your system requires.
How often should I check my battery switch?
Regularly inspect your battery switch for corrosion, loose connections, and proper operation. A visual check every few months, or before and after each trip, is recommended.
What happens if I accidentally leave the switch in the wrong position?
Leaving the switch in the wrong position could lead to battery drain, potentially damaging your batteries. Always ensure the switch is in the correct position before leaving your RV unattended.
Can I install a battery switch myself?
While possible, installing a battery switch involves working with electricity. If you’re uncomfortable with electrical work, it’s best to consult a qualified RV technician.
